> ## Documentation Index
> Fetch the complete documentation index at: https://drippi.mintlify.site/llms.txt
> Use this file to discover all available pages before exploring further.

# Quickstart

> Start automating you cold DM outreach in less than 5 minutes  For a video tutorial go here: https://start.drippi.ai/campaign 

## Set up your first campaign

1. Open up [<u>Drippi.ai</u>](http://Drippi.ai) and login
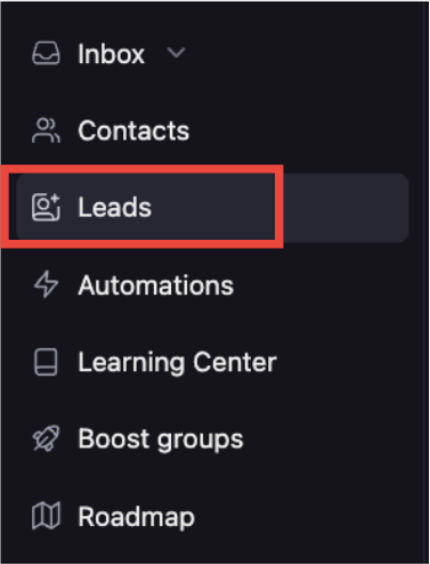
2. Go to Leads on the menu on the left side of the screen:
   <img src="https://mintcdn.com/drippi/uJYbabuHeFkHdS-Y/images/Screenshot2025-10-22at10.11.33AM.png?fit=max&auto=format&n=uJYbabuHeFkHdS-Y&q=85&s=bff78f84254b4edafc19c0b3218f3e31" alt="Screenshot2025 10 22at10 11 33AM Pn" width="430" height="564" data-path="images/Screenshot2025-10-22at10.11.33AM.png" />
3. Select + New Lead Source:

   <img src="https://mintcdn.com/drippi/zDIv5BmlB5lS5pyy/images/image.png?fit=max&auto=format&n=zDIv5BmlB5lS5pyy&q=85&s=1f6ba46b5b851ee3c018e8149baa6849" alt="image.png" width="1268" height="828" data-path="images/image.png" />
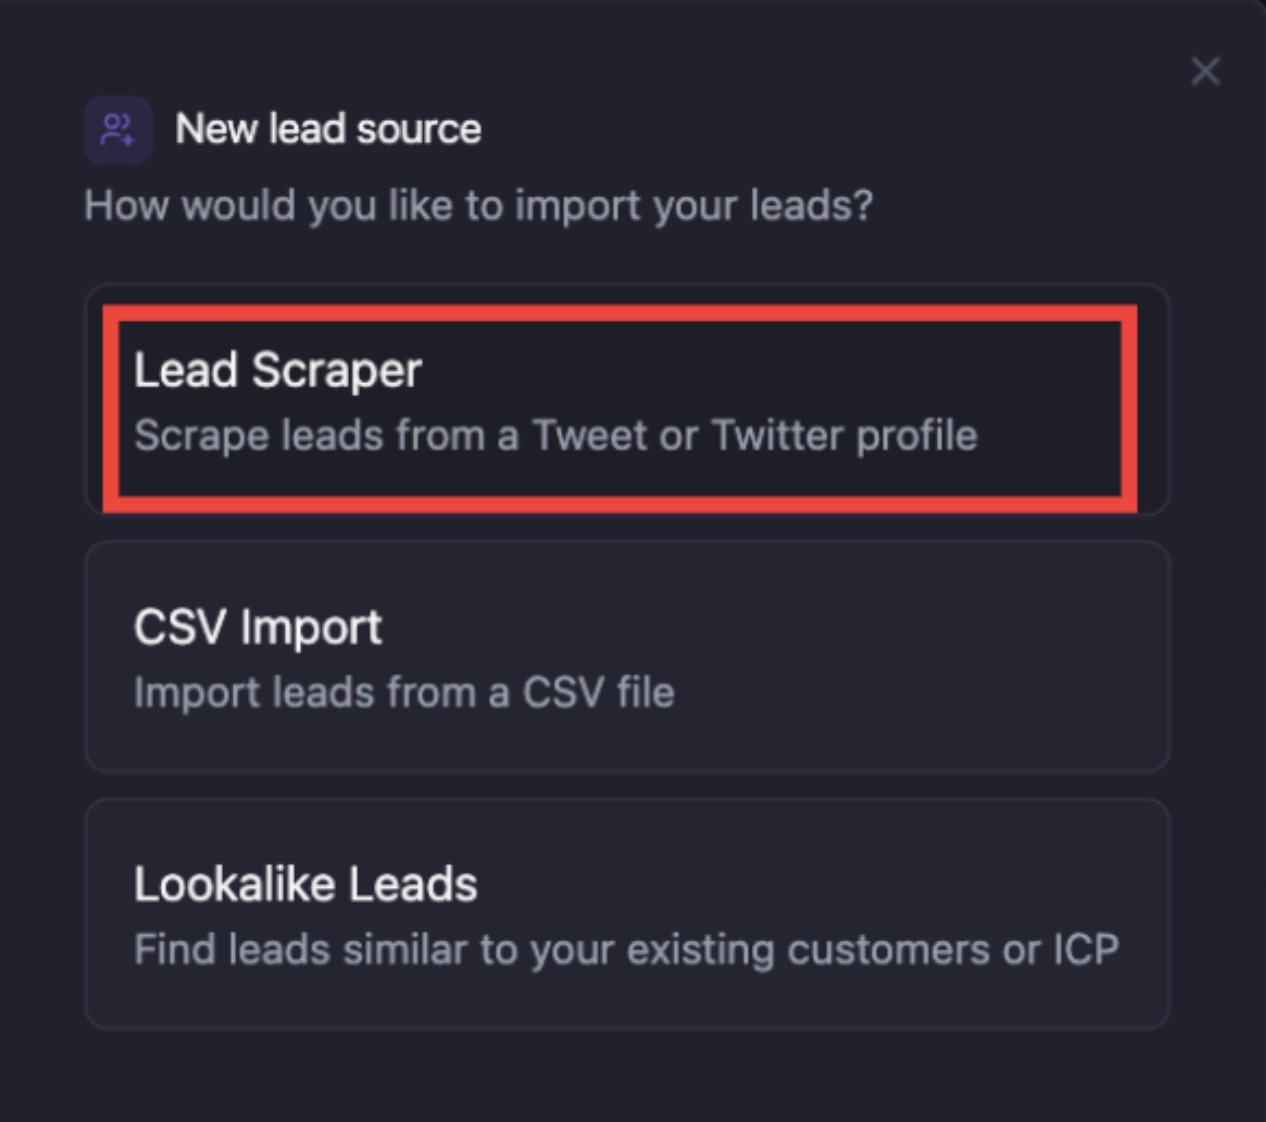
4. Select Lead Scraper:

   <img src="https://mintcdn.com/drippi/gdtOFt8rmEFBV6fo/images/Screenshot2025-10-27at7.56.07AM.png?fit=max&auto=format&n=gdtOFt8rmEFBV6fo&q=85&s=3a38e9a70a157da6acf122135f1c8226" alt="Screenshot 2025-10-27 at 7.56.07 AM.png" width="1266" height="1122" data-path="images/Screenshot2025-10-27at7.56.07AM.png" />
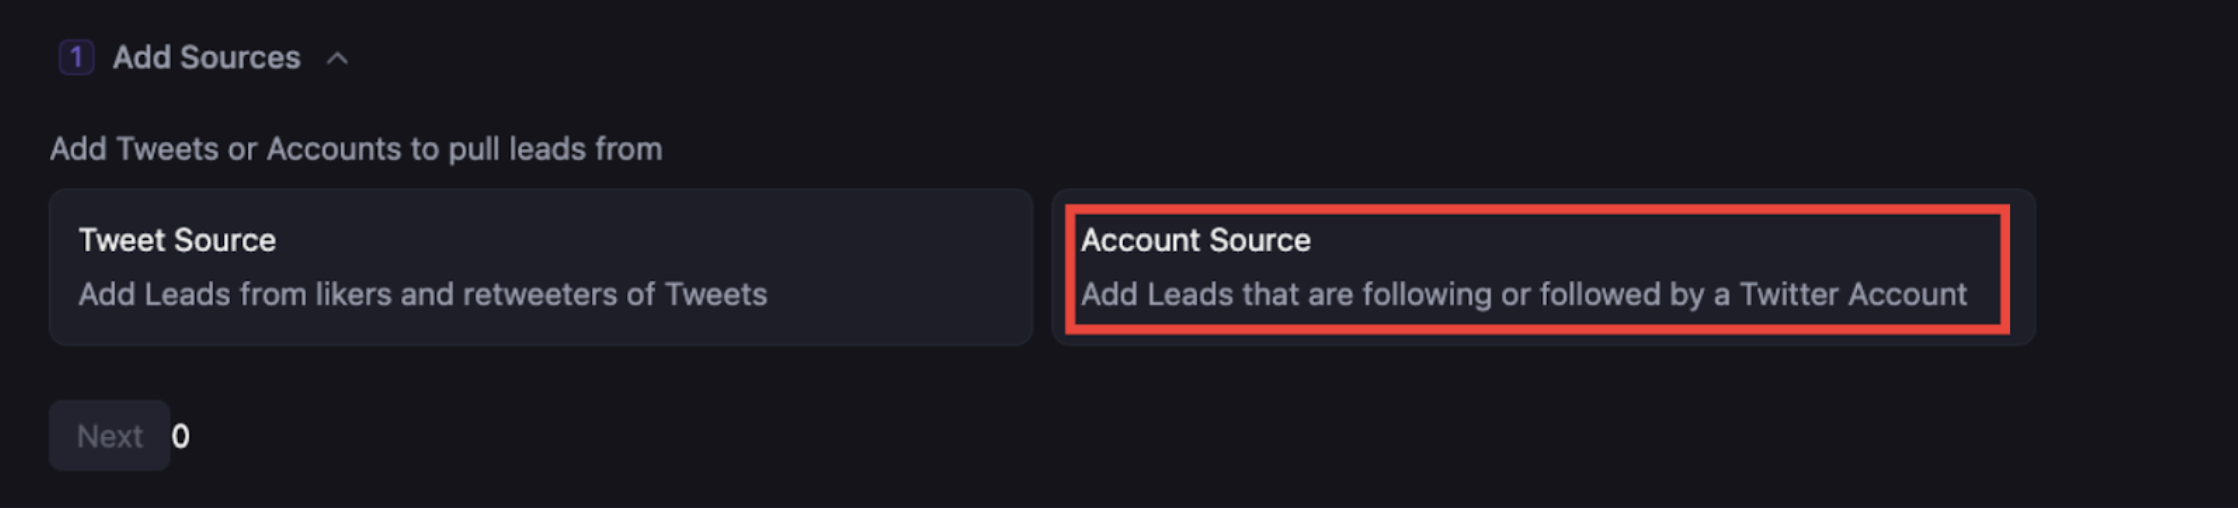
5. Select account or tweet source:

   <img src="https://mintcdn.com/drippi/gdtOFt8rmEFBV6fo/images/Screenshot2025-10-27at7.56.24AM.png?fit=max&auto=format&n=gdtOFt8rmEFBV6fo&q=85&s=ce64e86e0ab0b1d03f155c58f0b54d7f" alt="Screenshot 2025-10-27 at 7.56.24 AM.png" width="2238" height="508" data-path="images/Screenshot2025-10-27at7.56.24AM.png" />
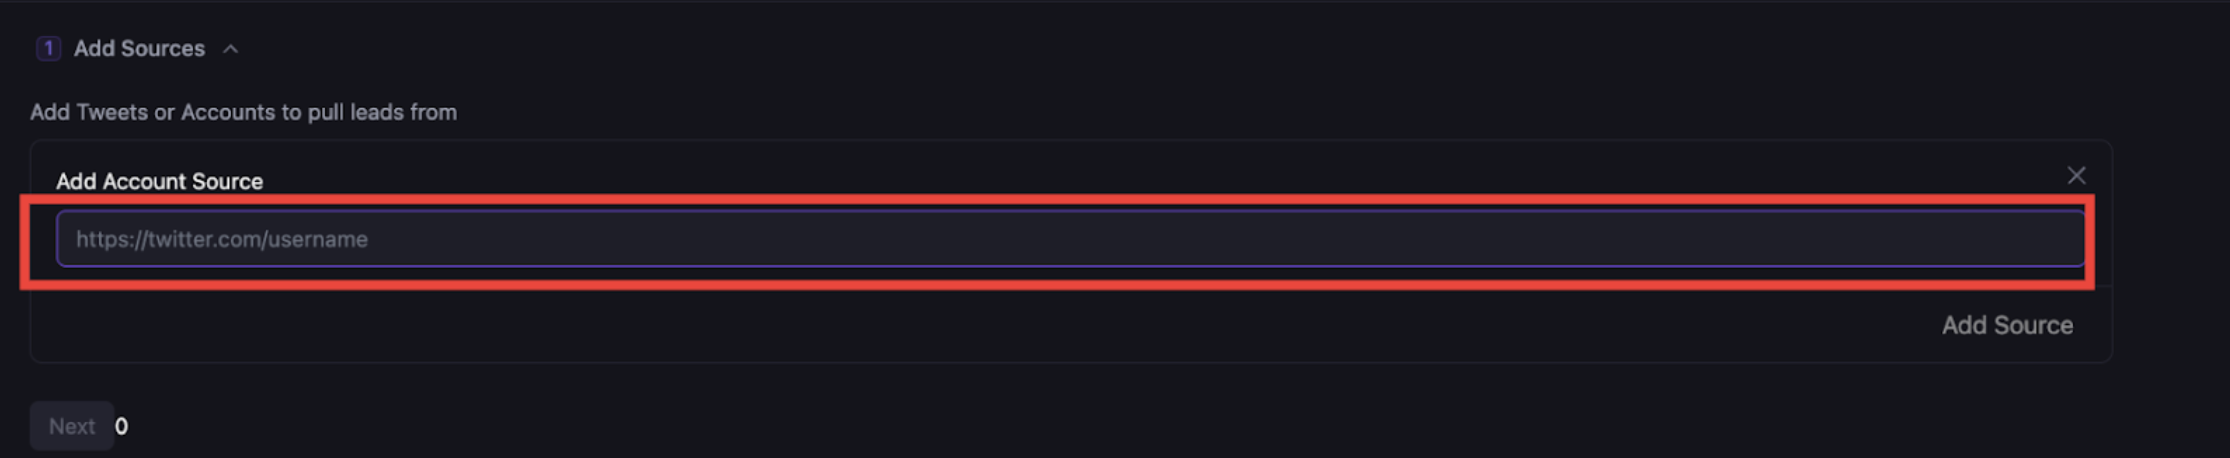
6. Paste the first lead source into the link space provided and wait for the profile to load:
   <img src="https://mintcdn.com/drippi/gdtOFt8rmEFBV6fo/images/Screenshot2025-10-27at7.56.45AM.png?fit=max&auto=format&n=gdtOFt8rmEFBV6fo&q=85&s=d74d4215778939f0cd410b76b06d144c" alt="Screenshot 2025-10-27 at 7.56.45 AM.png" width="2230" height="458" data-path="images/Screenshot2025-10-27at7.56.45AM.png" />
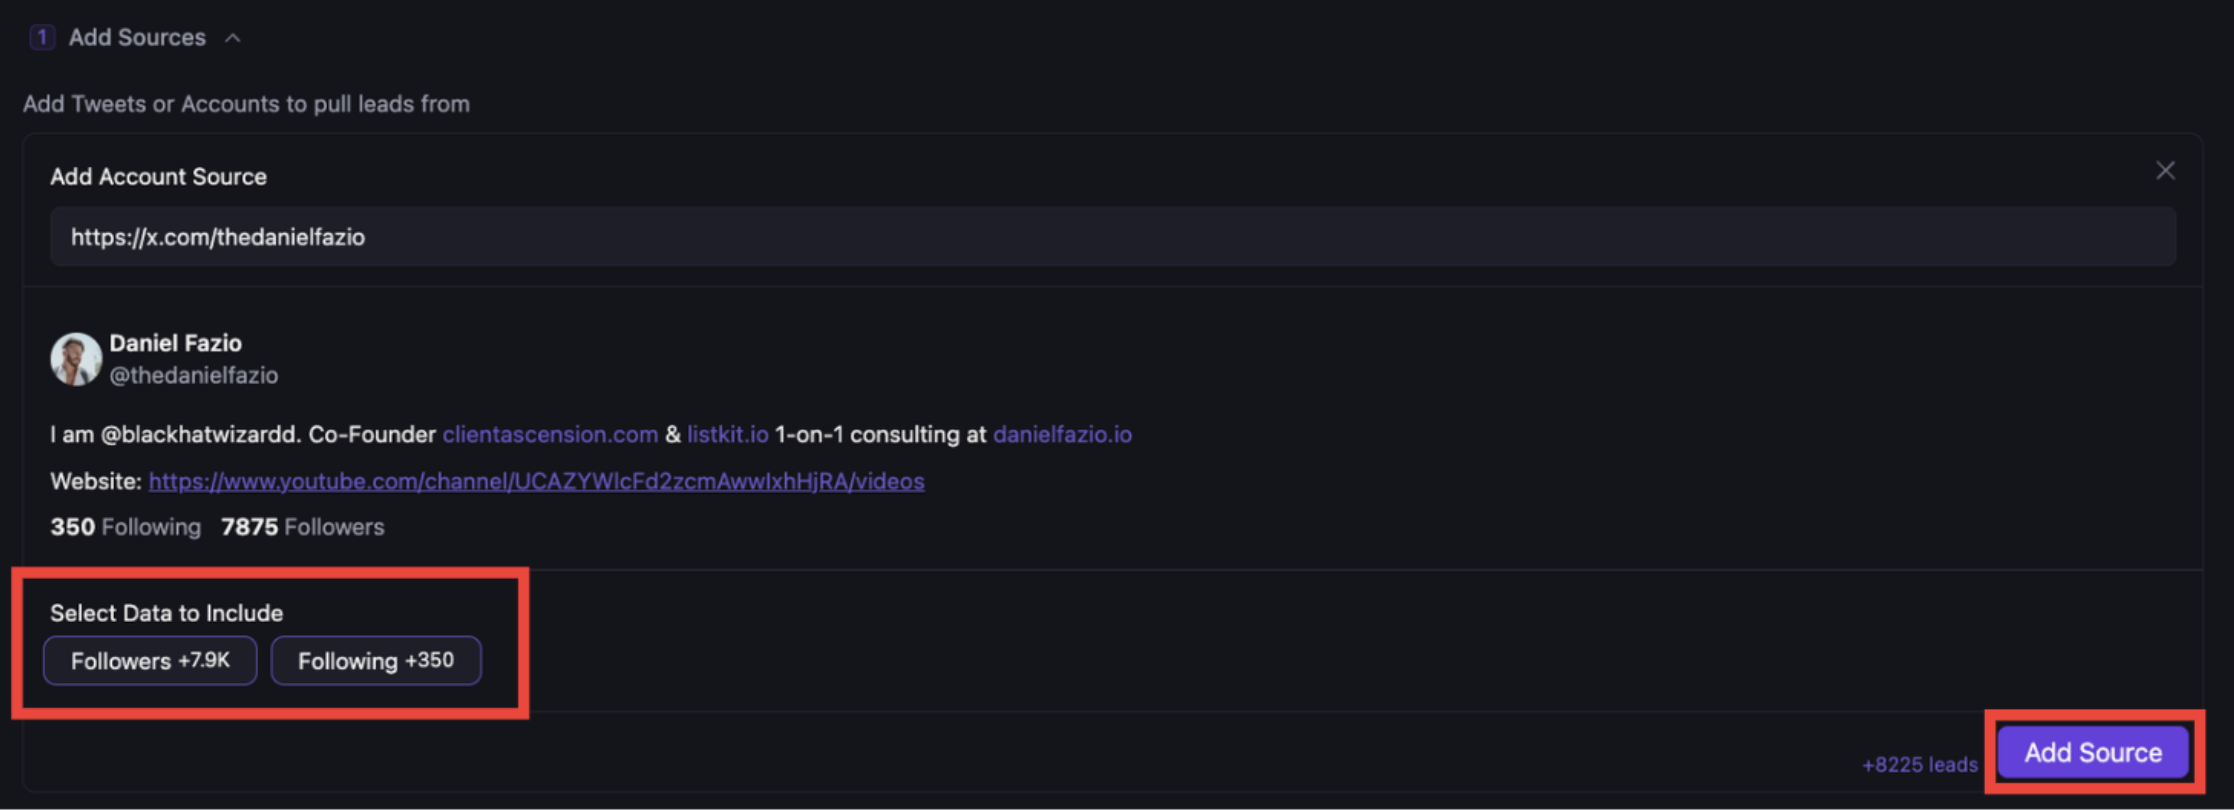
7. Select followers and/or following (depending on campaign) and hit add source on the bottom right hand corner
   <img src="https://mintcdn.com/drippi/gdtOFt8rmEFBV6fo/images/Screenshot2025-10-27at7.57.04AM.png?fit=max&auto=format&n=gdtOFt8rmEFBV6fo&q=85&s=ce2cee892e53837925b3df05e9a54907" alt="Screenshot 2025-10-27 at 7.57.04 AM.png" width="2234" height="810" data-path="images/Screenshot2025-10-27at7.57.04AM.png" />
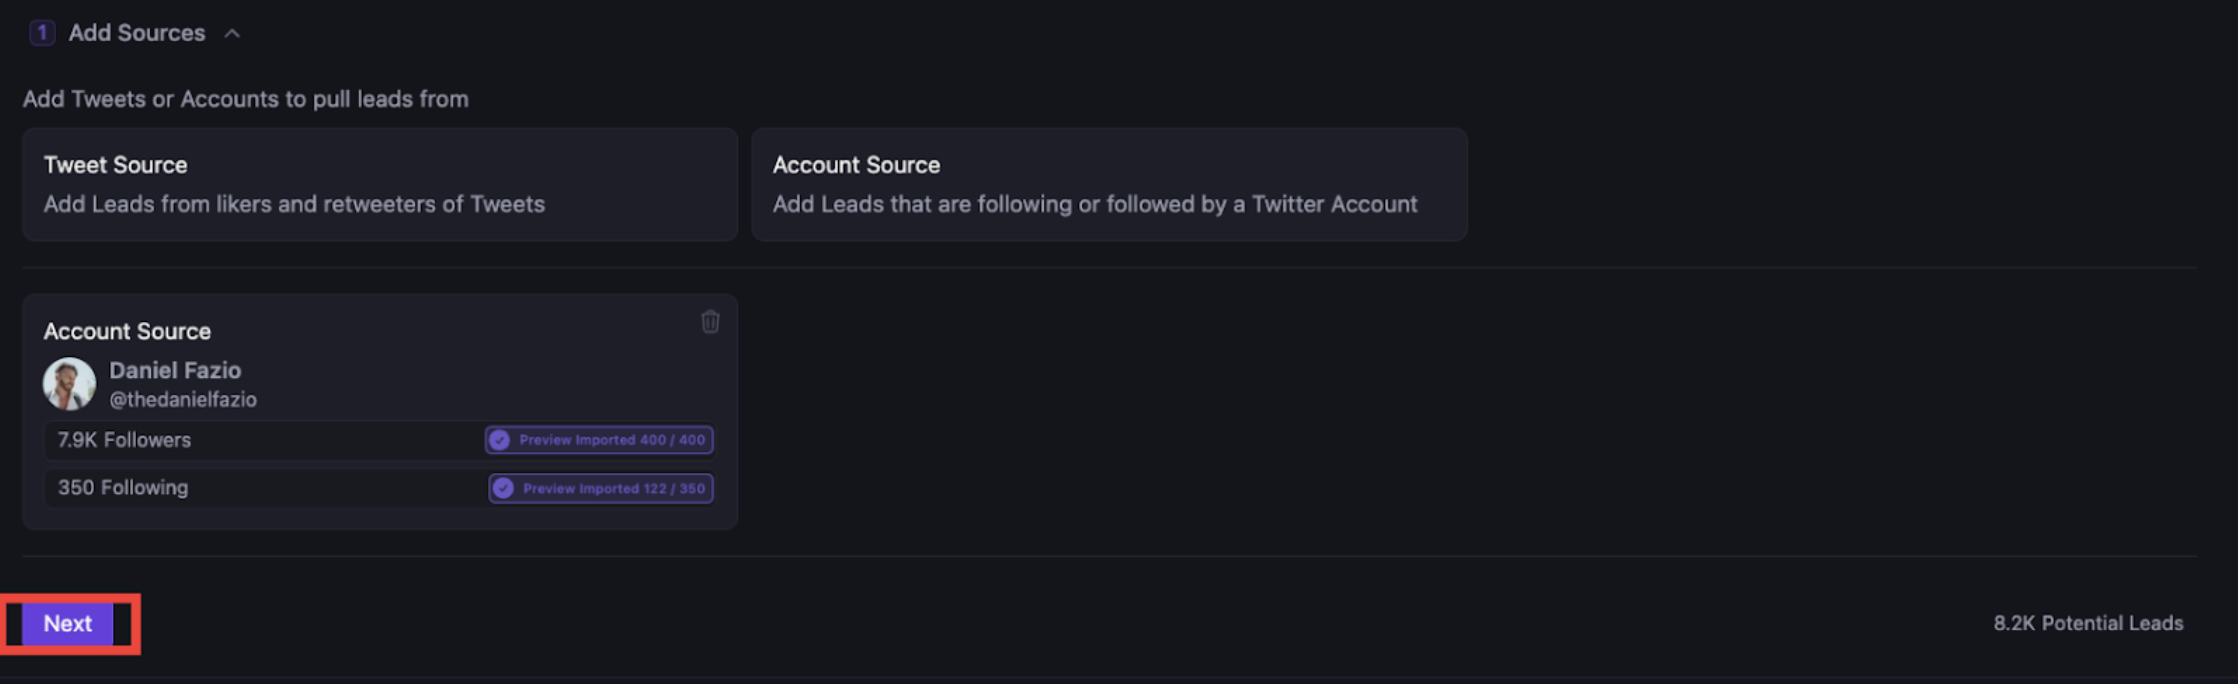
8. Add more sources by repeating steps 7, 8, and 9 until the lead size is enough to where you think AFTER filters the campaign will have AT LEAST 20,000 leads
9. Hit Next:
   <img src="https://mintcdn.com/drippi/gdtOFt8rmEFBV6fo/images/Screenshot2025-10-27at7.57.21AM.png?fit=max&auto=format&n=gdtOFt8rmEFBV6fo&q=85&s=36670ca166a0754b4a34168ef319e358" alt="Screenshot 2025-10-27 at 7.57.21 AM.png" width="2238" height="684" data-path="images/Screenshot2025-10-27at7.57.21AM.png" />
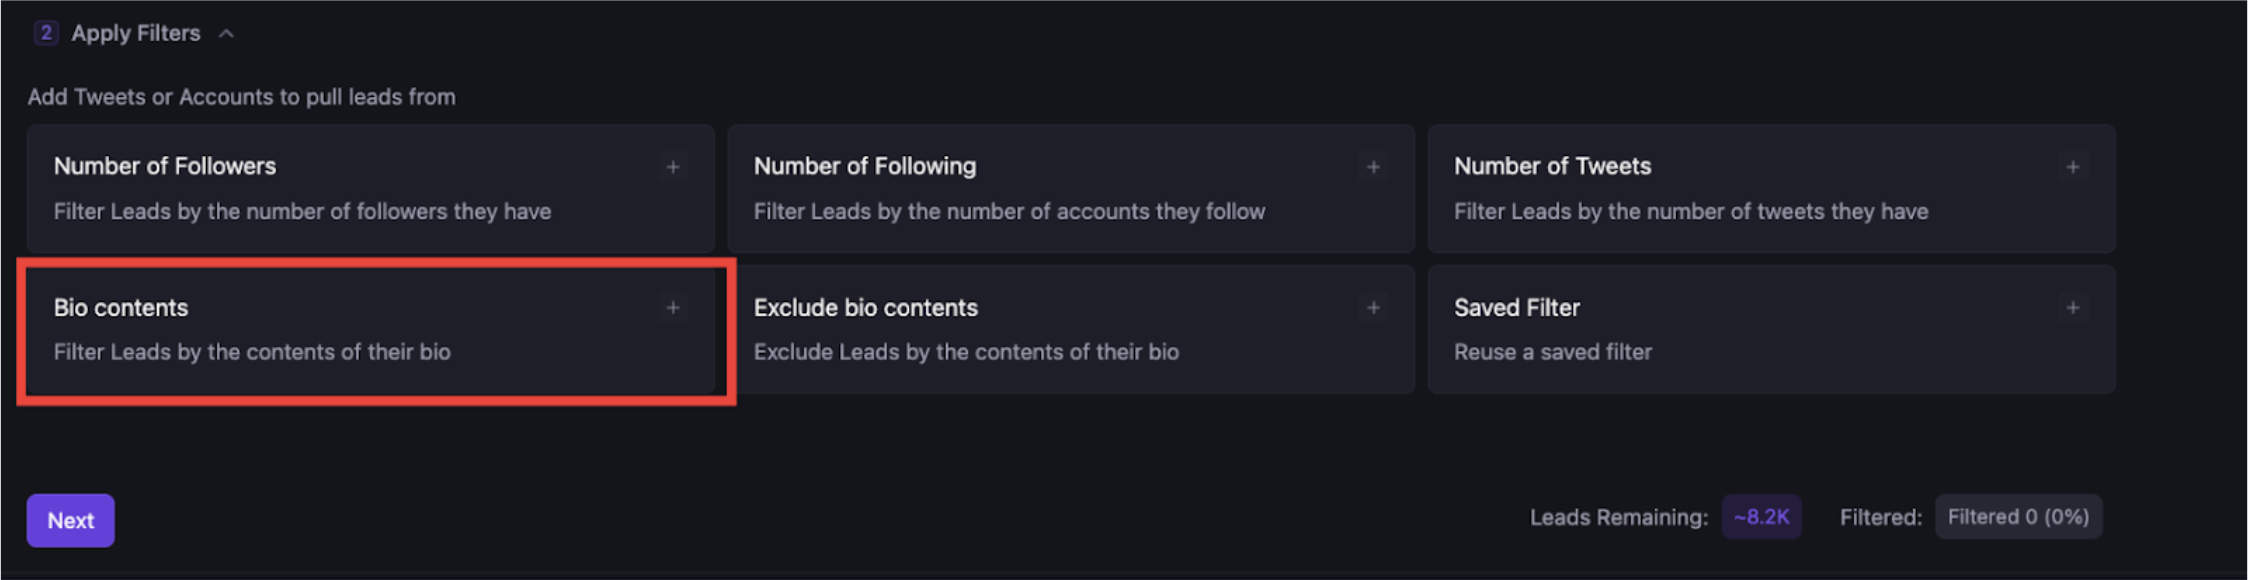
10. Select Bio Contents

    <img src="https://mintcdn.com/drippi/gdtOFt8rmEFBV6fo/images/Screenshot2025-10-27at7.57.40AM.png?fit=max&auto=format&n=gdtOFt8rmEFBV6fo&q=85&s=5a4158958cec4a6c5f6be954ed5f2e71" alt="Screenshot 2025-10-27 at 7.57.40 AM.png" width="2248" height="580" data-path="images/Screenshot2025-10-27at7.57.40AM.png" />
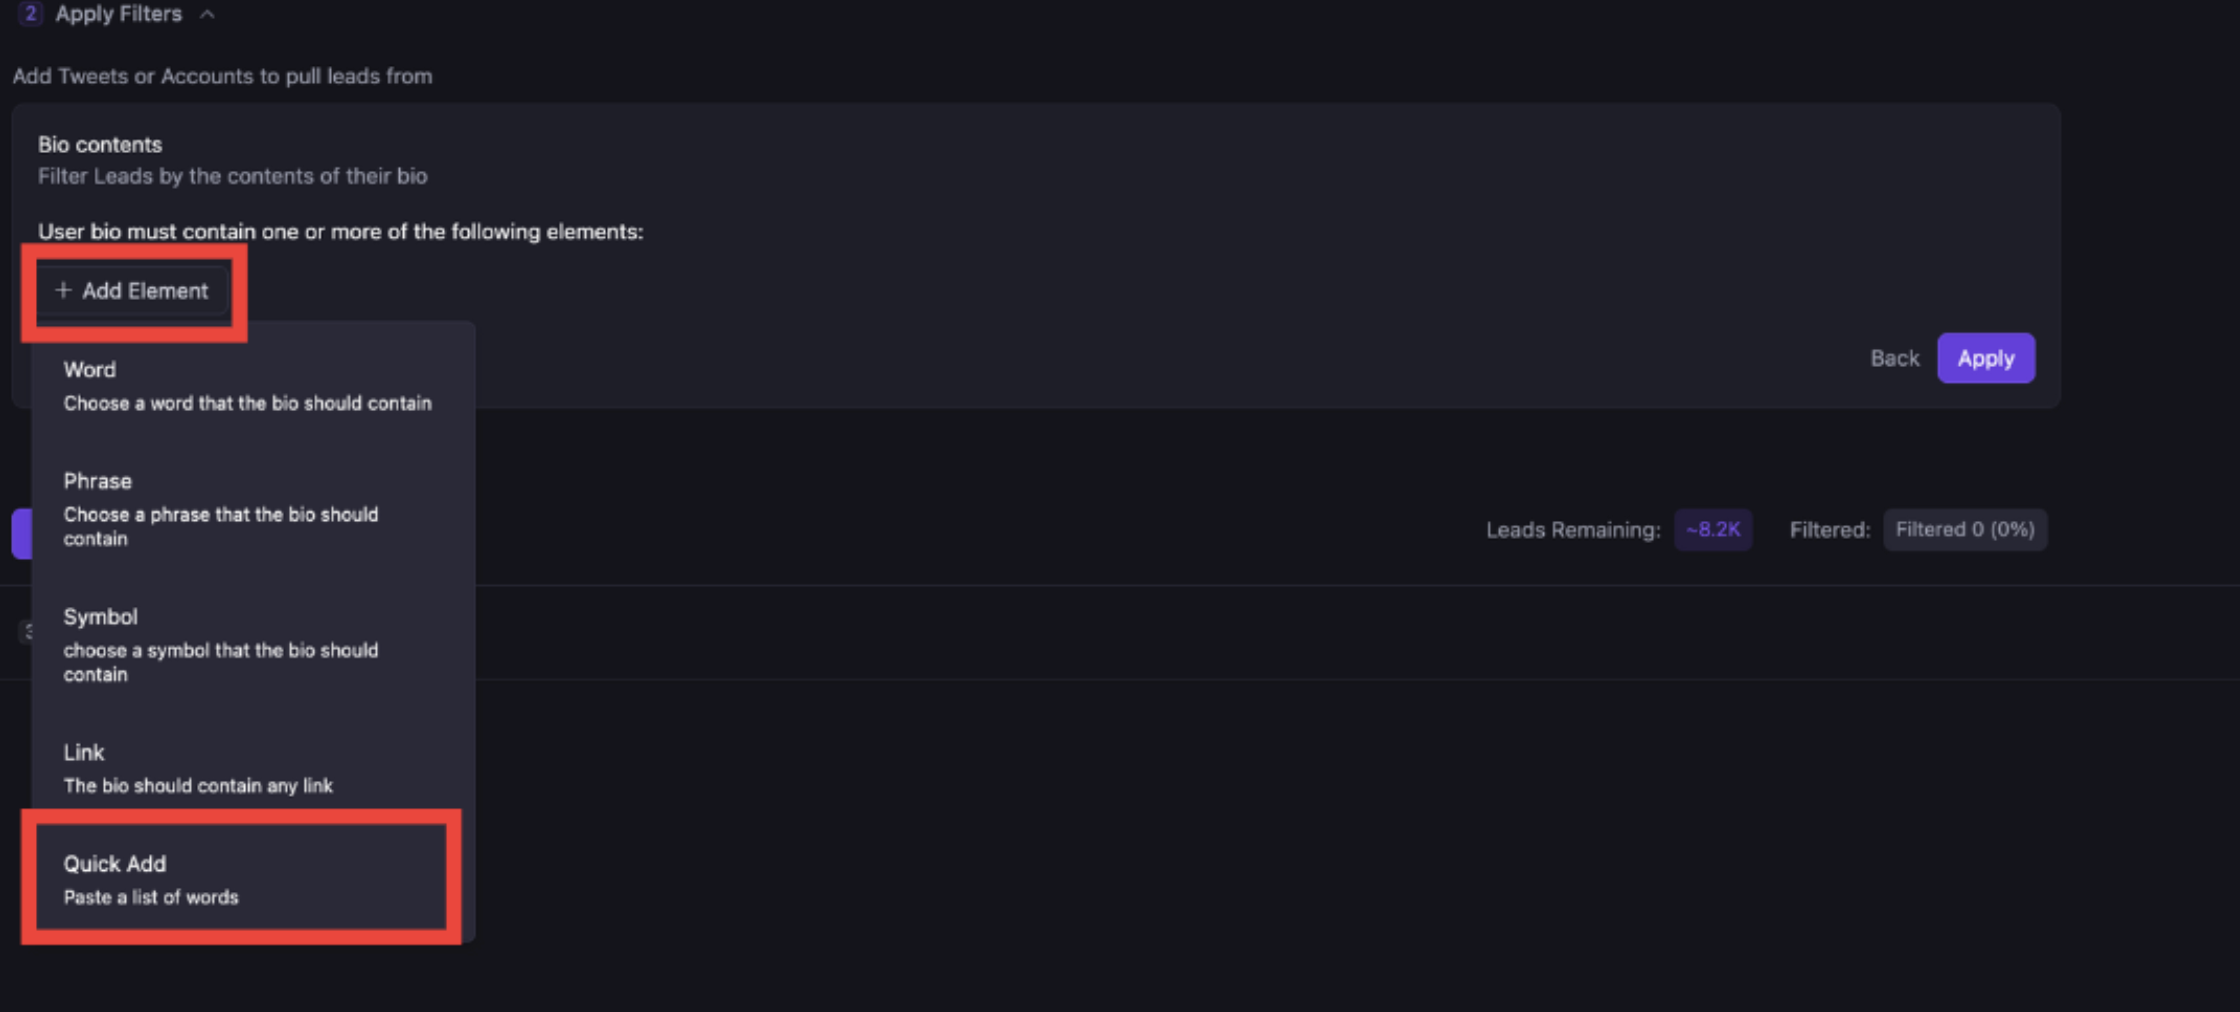
11. Hit *add element* and then hit *Quick Add*
    <img src="https://mintcdn.com/drippi/gdtOFt8rmEFBV6fo/images/Screenshot2025-10-27at7.57.56AM.png?fit=max&auto=format&n=gdtOFt8rmEFBV6fo&q=85&s=3aa4ba0180a0bb73667cd0b6fcb0df80" alt="Screenshot 2025-10-27 at 7.57.56 AM.png" width="2240" height="1012" data-path="images/Screenshot2025-10-27at7.57.56AM.png" />
12. Watch this video for the quick add feature: [<u>https://www.loom.com/share/e0c0b7ac04dc40caae626d8fc0043d9f</u>](https://www.loom.com/share/e0c0b7ac04dc40caae626d8fc0043d9f) 
13. After you’ve got your keywords, repeat the process for negative keywords
14. Add a *number of followers* filter (if applicable)
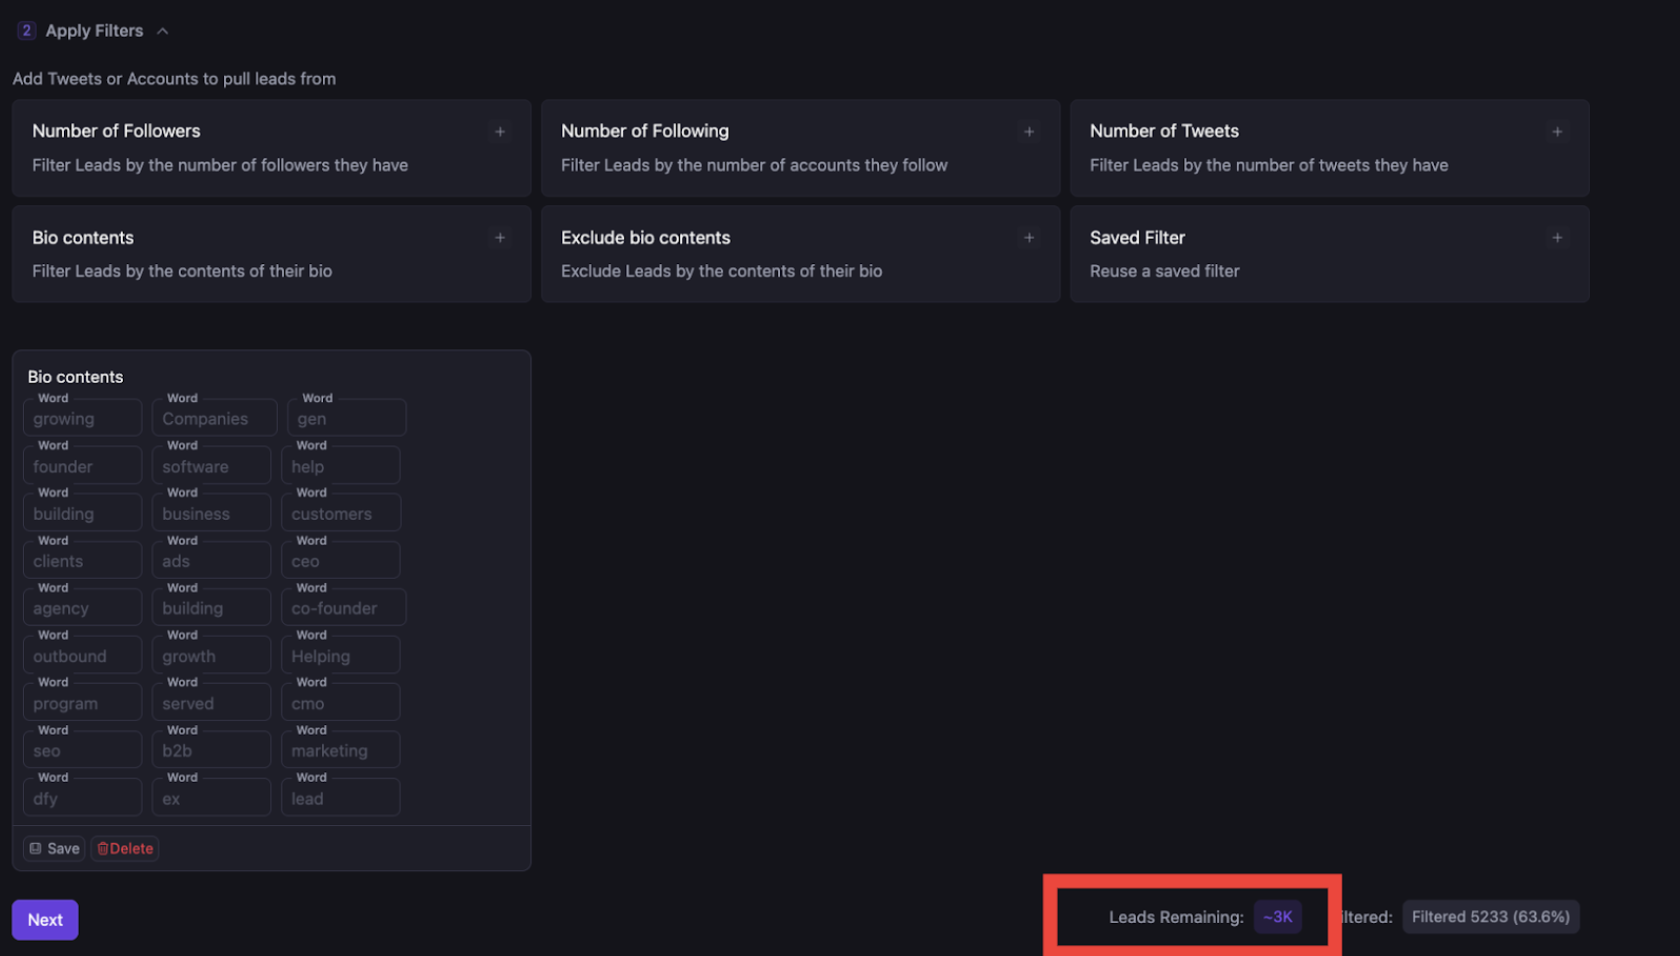
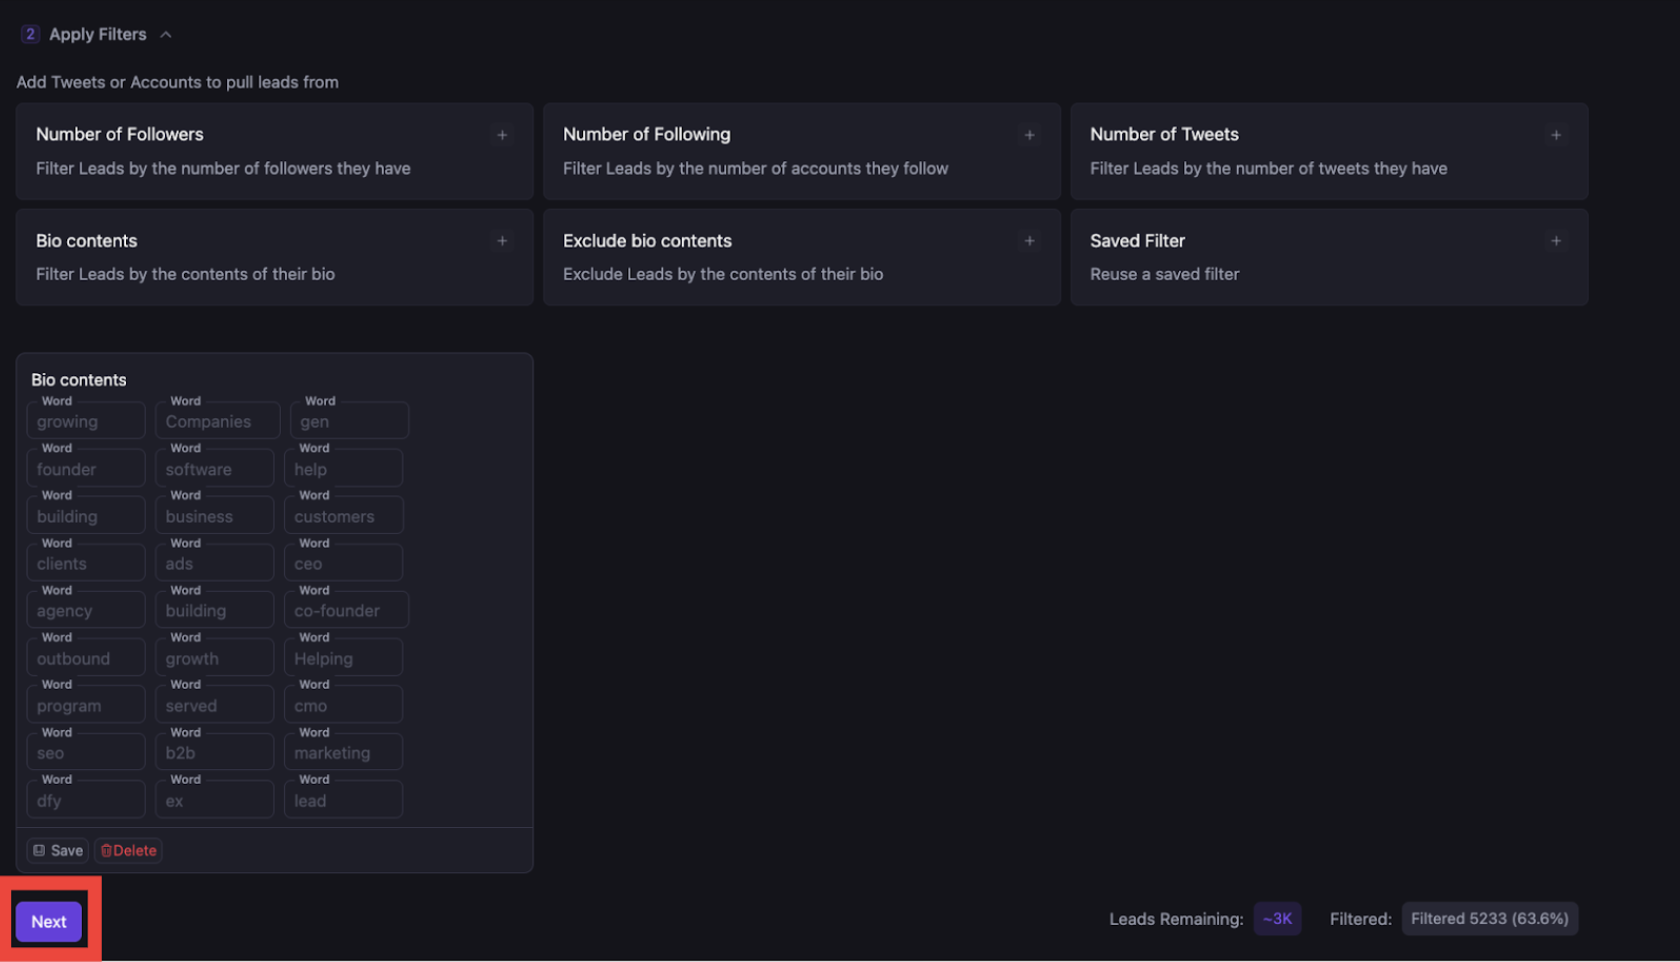
15. Check how many leads are remaining
    <img src="https://mintcdn.com/drippi/gdtOFt8rmEFBV6fo/images/Screenshot2025-10-27at7.59.06AM.png?fit=max&auto=format&n=gdtOFt8rmEFBV6fo&q=85&s=1a75526a765b42dde5728b02effebffe" alt="Screenshot 2025-10-27 at 7.59.06 AM.png" width="1680" height="956" data-path="images/Screenshot2025-10-27at7.59.06AM.png" />
16. If it’s LESS than 20,000 then go back to step 7 and add more lead sources.
17. Once you’ve got over 20,000, hit NEXT 
    <img src="https://mintcdn.com/drippi/gdtOFt8rmEFBV6fo/images/Screenshot2025-10-27at7.59.26AM.png?fit=max&auto=format&n=gdtOFt8rmEFBV6fo&q=85&s=6c2846d97521b738eae30f2fa1bc3521" alt="Screenshot 2025-10-27 at 7.59.26 AM.png" width="1680" height="962" data-path="images/Screenshot2025-10-27at7.59.26AM.png" />
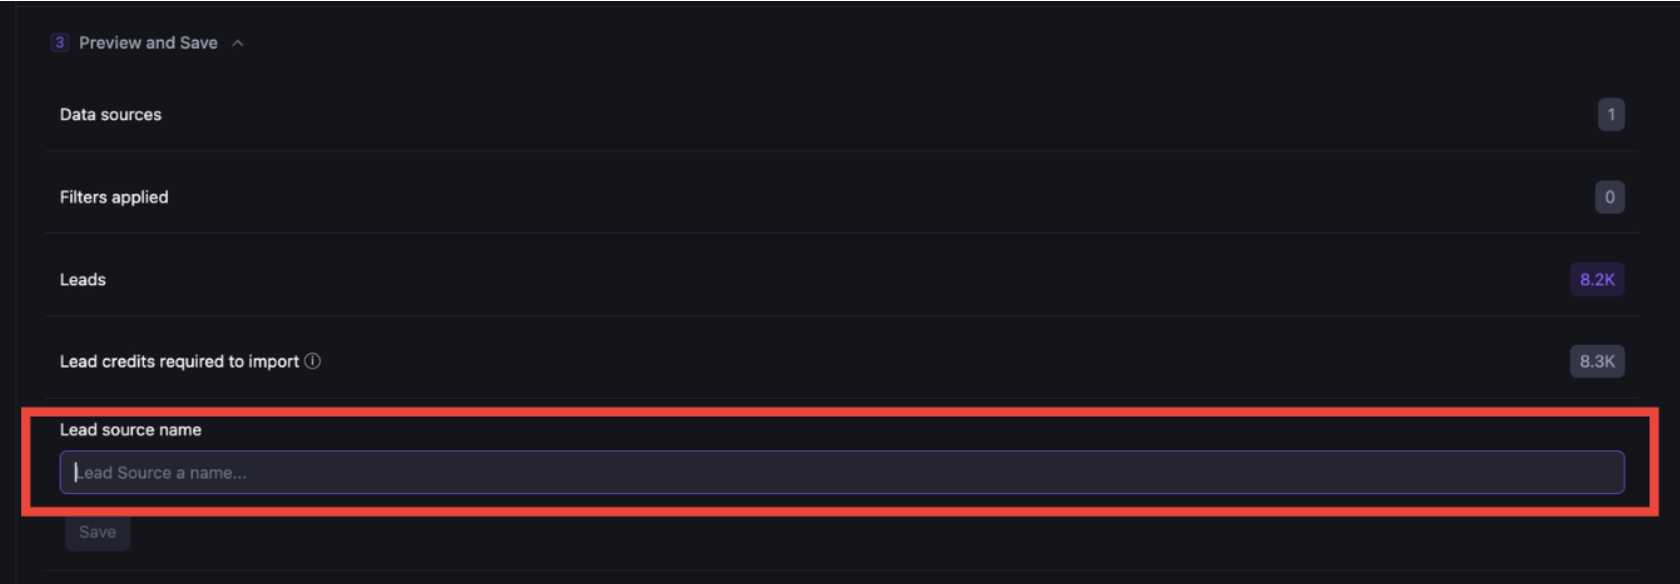
18. Name the lead source in the following manner: CLIENT NAME \<> DATE \<> SCRIPT \<> ACCOUNT NAME
    <img src="https://mintcdn.com/drippi/gdtOFt8rmEFBV6fo/images/Screenshot2025-10-27at7.59.46AM.png?fit=max&auto=format&n=gdtOFt8rmEFBV6fo&q=85&s=059ed1aa227e2d19791abeda7e3135af" alt="Screenshot 2025-10-27 at 7.59.46 AM.png" width="1680" height="584" data-path="images/Screenshot2025-10-27at7.59.46AM.png" />
19. Hit Save

    <img src="https://mintcdn.com/drippi/gdtOFt8rmEFBV6fo/images/Screenshot2025-10-27at8.00.01AM.png?fit=max&auto=format&n=gdtOFt8rmEFBV6fo&q=85&s=a5cb240ff20cc8fc068d3f4465df1256" alt="Screenshot 2025-10-27 at 8.00.01 AM.png" width="1678" height="188" data-path="images/Screenshot2025-10-27at8.00.01AM.png" />
20. Go to the automations tab:

    <img src="https://mintcdn.com/drippi/gdtOFt8rmEFBV6fo/images/Screenshot2025-10-27at8.00.14AM.png?fit=max&auto=format&n=gdtOFt8rmEFBV6fo&q=85&s=5c86e58615380892d0baddeb5acc3cf3" alt="Screenshot 2025-10-27 at 8.00.14 AM.png" width="576" height="970" data-path="images/Screenshot2025-10-27at8.00.14AM.png" />
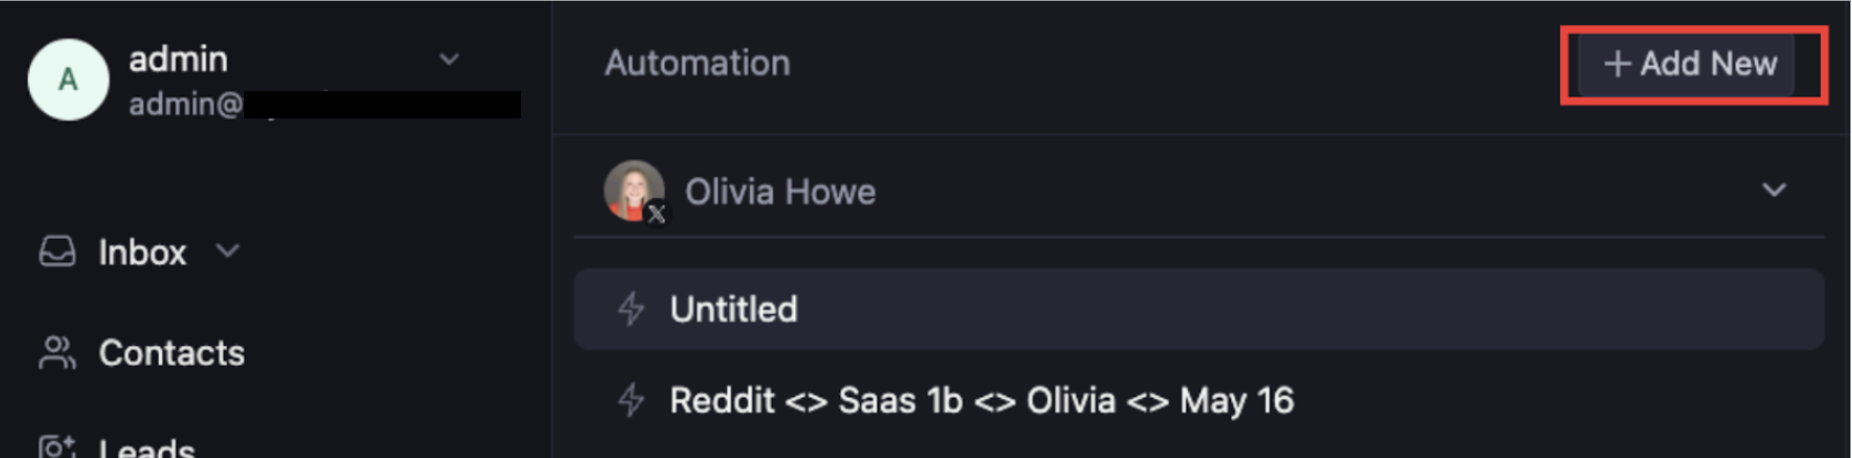
21. Hit *add new*

    <img src="https://mintcdn.com/drippi/gdtOFt8rmEFBV6fo/images/Screenshot2025-10-27at8.01.57AM.png?fit=max&auto=format&n=gdtOFt8rmEFBV6fo&q=85&s=06cb87360b74e3daf9e6bee22fb32803" alt="Screenshot 2025-10-27 at 8.01.57 AM.png" width="1852" height="458" data-path="images/Screenshot2025-10-27at8.01.57AM.png" />
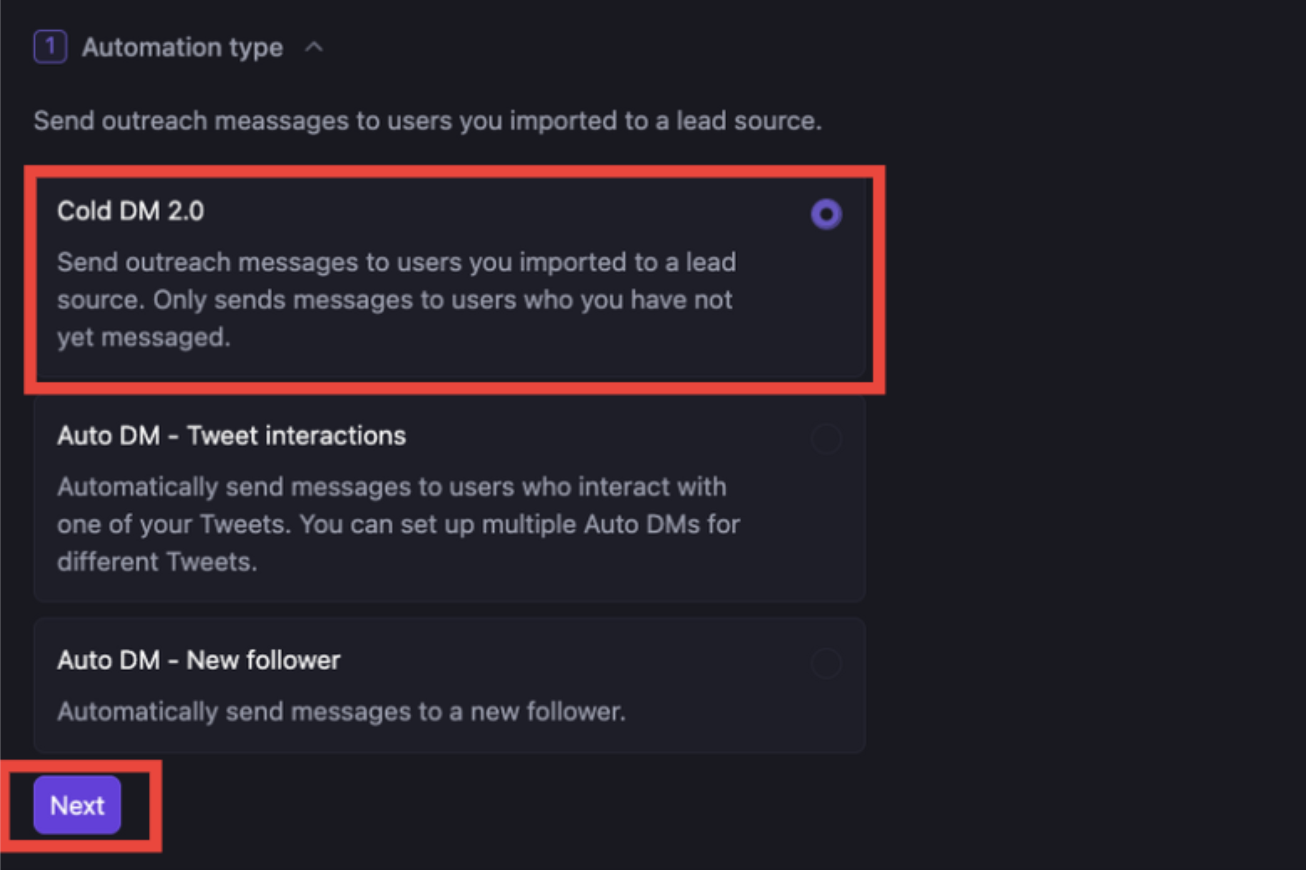
22. Select *Cold DM 2.0* then hit *Next*
    <img src="https://mintcdn.com/drippi/gdtOFt8rmEFBV6fo/images/Screenshot2025-10-27at8.02.34AM.png?fit=max&auto=format&n=gdtOFt8rmEFBV6fo&q=85&s=d5f9d6c93b451cc59f99ff33dcccf5e0" alt="Screenshot 2025-10-27 at 8.02.34 AM.png" width="1306" height="870" data-path="images/Screenshot2025-10-27at8.02.34AM.png" />
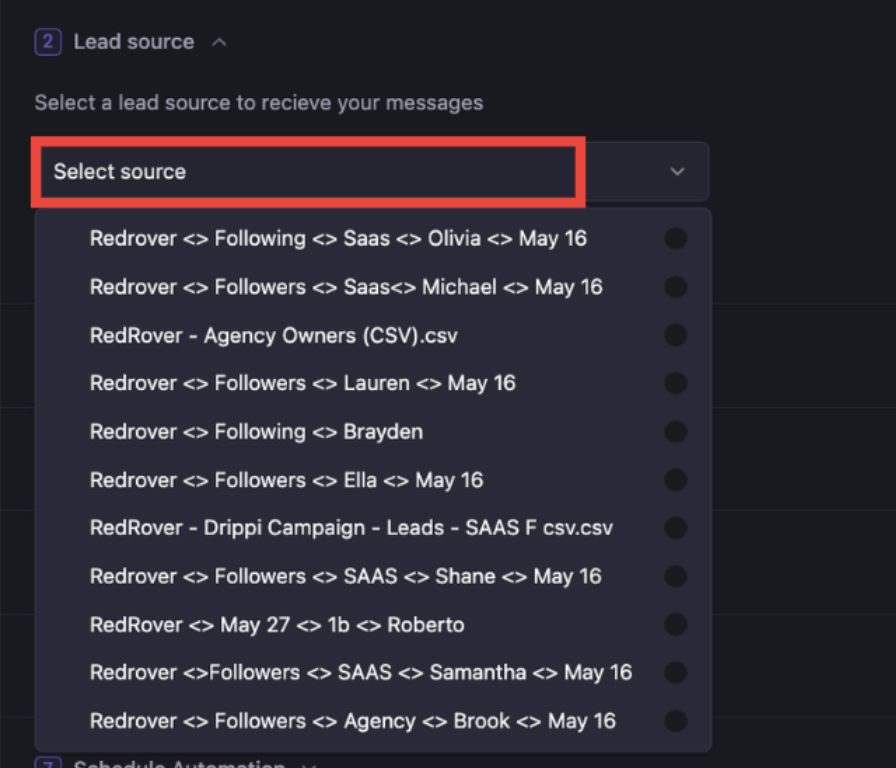
23. Hit select lead source and select the one you just made and hit next
    <img src="https://mintcdn.com/drippi/gdtOFt8rmEFBV6fo/images/Screenshot2025-10-27at8.02.52AM.png?fit=max&auto=format&n=gdtOFt8rmEFBV6fo&q=85&s=c32caed4d53dba20dcf8729e2f963367" alt="Screenshot 2025-10-27 at 8.02.52 AM.png" width="896" height="768" data-path="images/Screenshot2025-10-27at8.02.52AM.png" />
24. Select Script Personalizer and hit next

    <img src="https://mintcdn.com/drippi/gdtOFt8rmEFBV6fo/images/Screenshot2025-10-27at8.03.06AM.png?fit=max&auto=format&n=gdtOFt8rmEFBV6fo&q=85&s=4635134df81e3ab54fd7cc458636fdb2" alt="Screenshot 2025-10-27 at 8.03.06 AM.png" width="1688" height="254" data-path="images/Screenshot2025-10-27at8.03.06AM.png" />
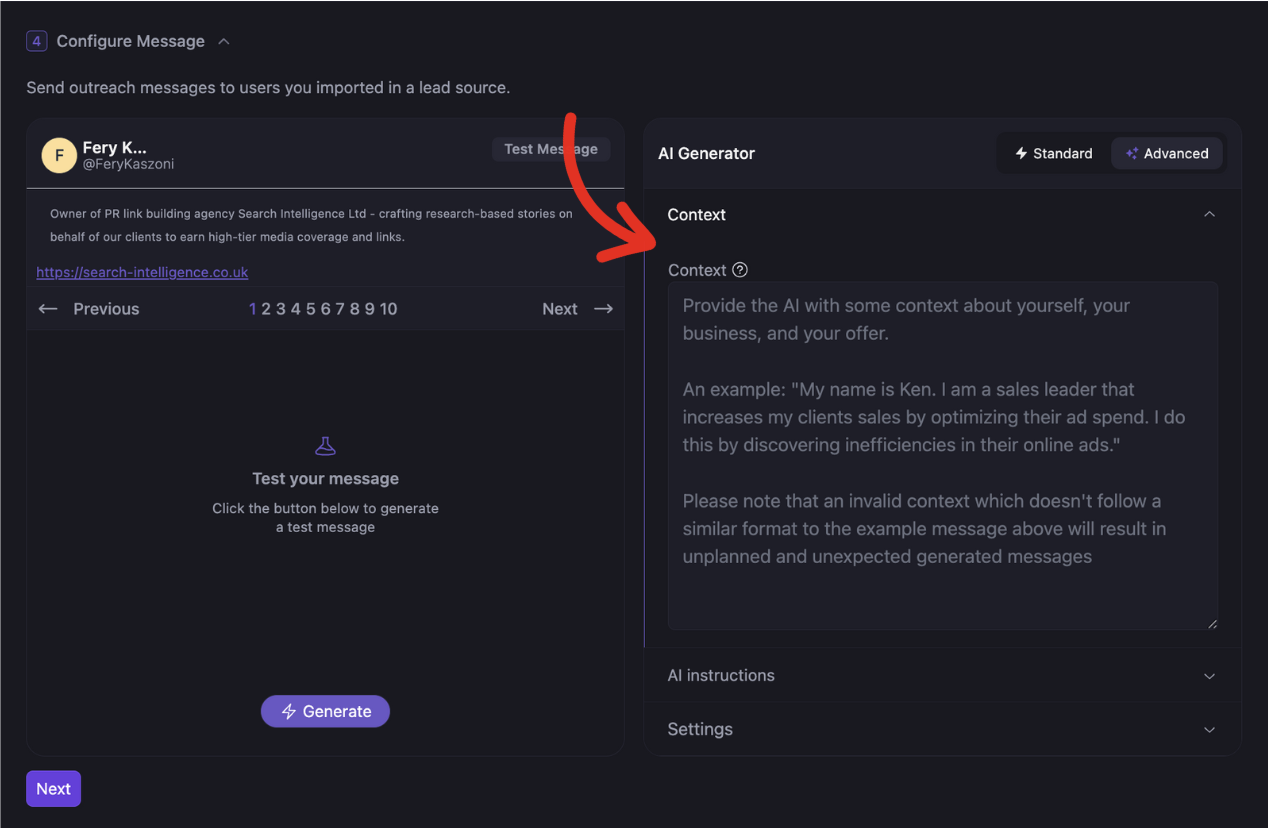
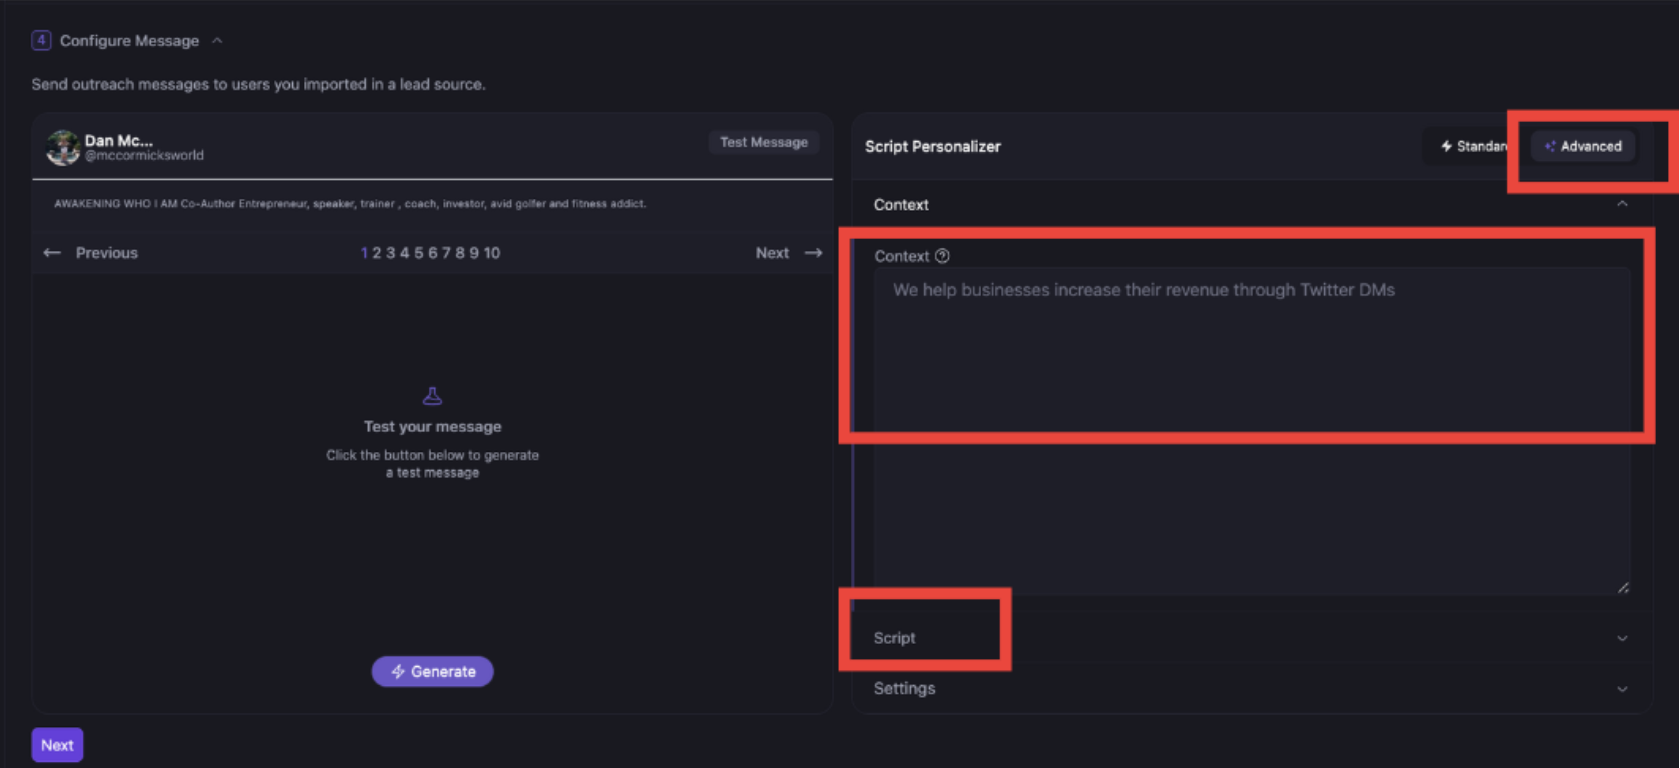
25. Select *Advanced*, Add *Context*, and then hit *Script*
    <img src="https://mintcdn.com/drippi/gdtOFt8rmEFBV6fo/images/Screenshot2025-10-27at8.03.23AM.png?fit=max&auto=format&n=gdtOFt8rmEFBV6fo&q=85&s=a3c3e858a46da805aa22a13780e2eab8" alt="Screenshot 2025-10-27 at 8.03.23 AM.png" width="1680" height="768" data-path="images/Screenshot2025-10-27at8.03.23AM.png" />
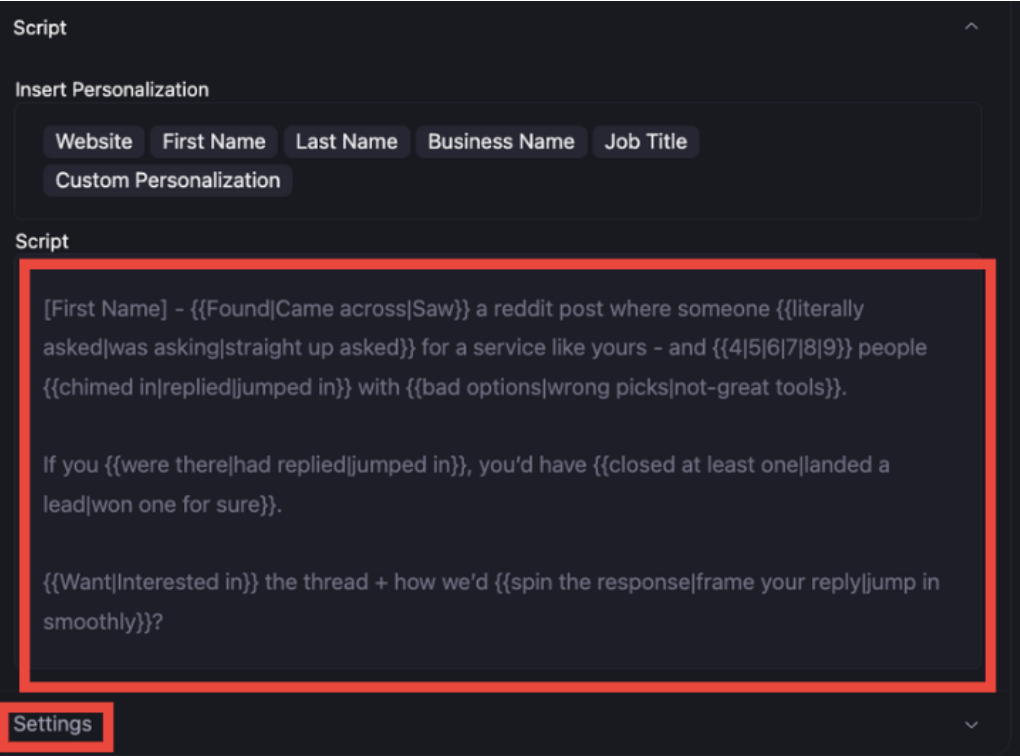
26. Add the corresponding script, make sure the variables are the correct ones, and hit *settings*
    <img src="https://mintcdn.com/drippi/gdtOFt8rmEFBV6fo/images/Screenshot2025-10-27at8.04.13AM.png?fit=max&auto=format&n=gdtOFt8rmEFBV6fo&q=85&s=a13c67172816843ddac5b8ff0e2830cb" alt="Screenshot 2025-10-27 at 8.04.13 AM.png" width="1020" height="756" data-path="images/Screenshot2025-10-27at8.04.13AM.png" />

    If you need help with scripts go here: [https://start.drippi.ai/scriptwriting](https://start.drippi.ai/scriptwriting)
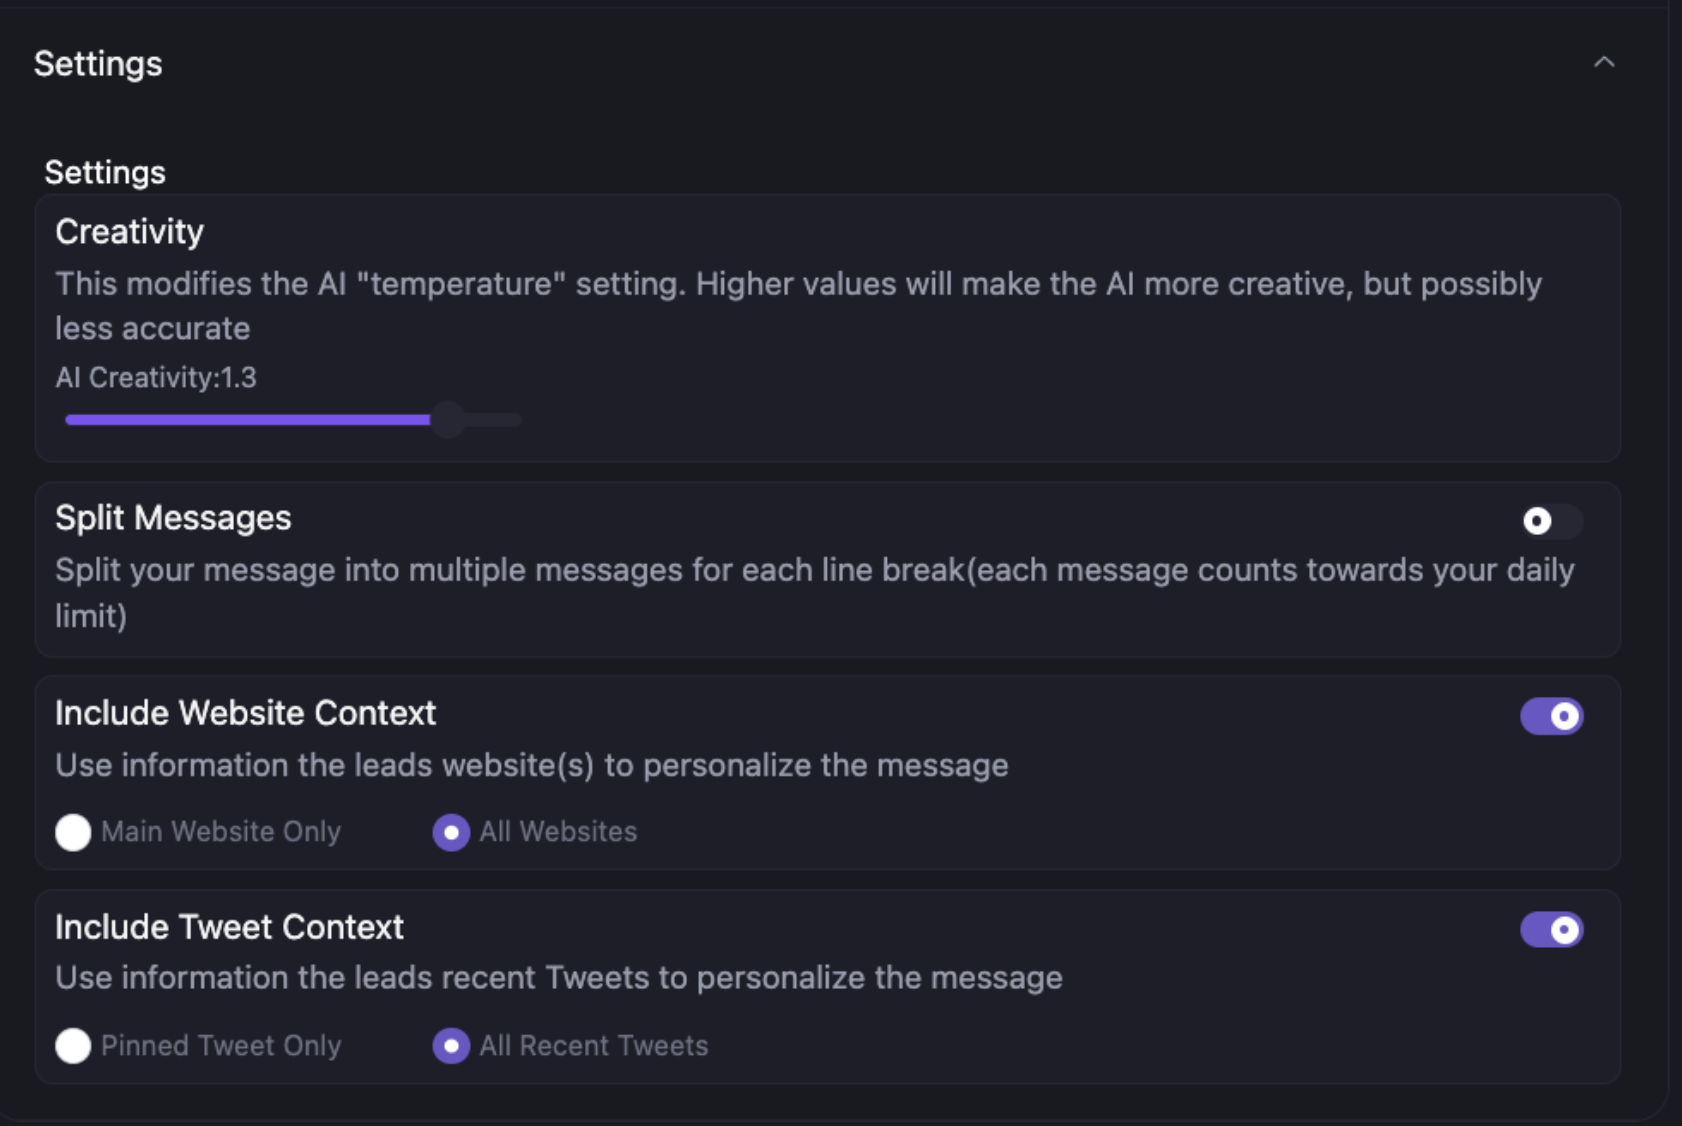
27. Make sure you set the settings just like below. If you have questions about the *Split Messages* toggle, please reach out to us at [support@drippi.ai](mailto:support@drippi.ai)
    <img src="https://mintcdn.com/drippi/gdtOFt8rmEFBV6fo/images/Screenshot2025-10-27at8.04.26AM.png?fit=max&auto=format&n=gdtOFt8rmEFBV6fo&q=85&s=3070d5f6b40aa7bd715f84d0829aec5c" alt="Screenshot 2025-10-27 at 8.04.26 AM.png" width="1682" height="1126" data-path="images/Screenshot2025-10-27at8.04.26AM.png" />
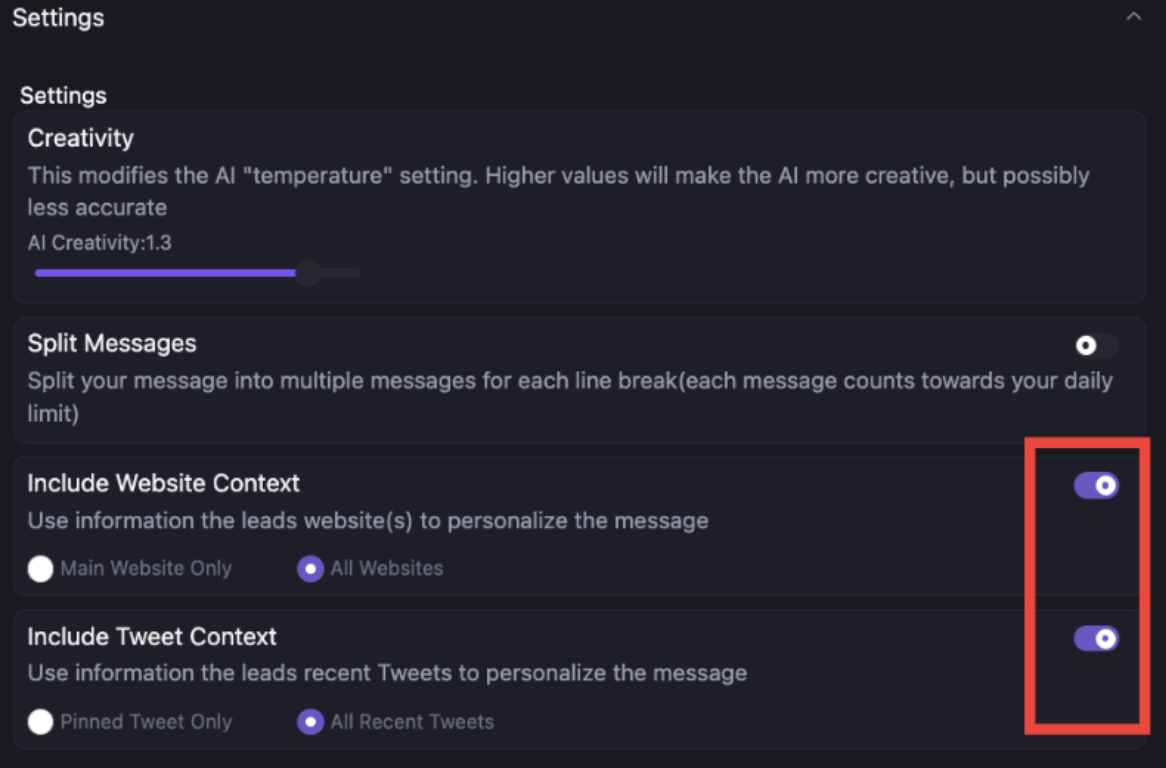
28. Make sure these are turned on as well, and hit next on the left
    <img src="https://mintcdn.com/drippi/gdtOFt8rmEFBV6fo/images/Screenshot2025-10-27at8.04.59AM.png?fit=max&auto=format&n=gdtOFt8rmEFBV6fo&q=85&s=b01107f960b740528f1e2b84b47bbc01" alt="Screenshot 2025-10-27 at 8.04.59 AM.png" width="1166" height="768" data-path="images/Screenshot2025-10-27at8.04.59AM.png" />
29. Hit *Next* on variables (or add any variable you'd like)
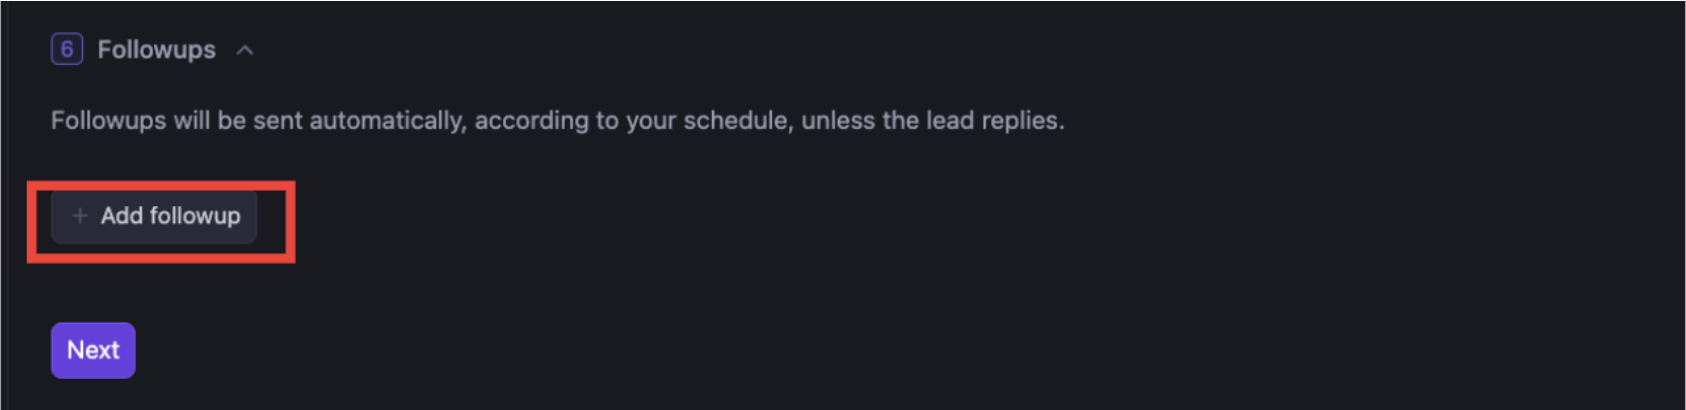
30. Hit *add followup*
    <img src="https://mintcdn.com/drippi/gdtOFt8rmEFBV6fo/images/Screenshot2025-10-27at8.05.27AM.png?fit=max&auto=format&n=gdtOFt8rmEFBV6fo&q=85&s=3966b55cb9096c9d8f13da3b9e622cb3" alt="Screenshot 2025-10-27 at 8.05.27 AM.png" width="1686" height="410" data-path="images/Screenshot2025-10-27at8.05.27AM.png" />
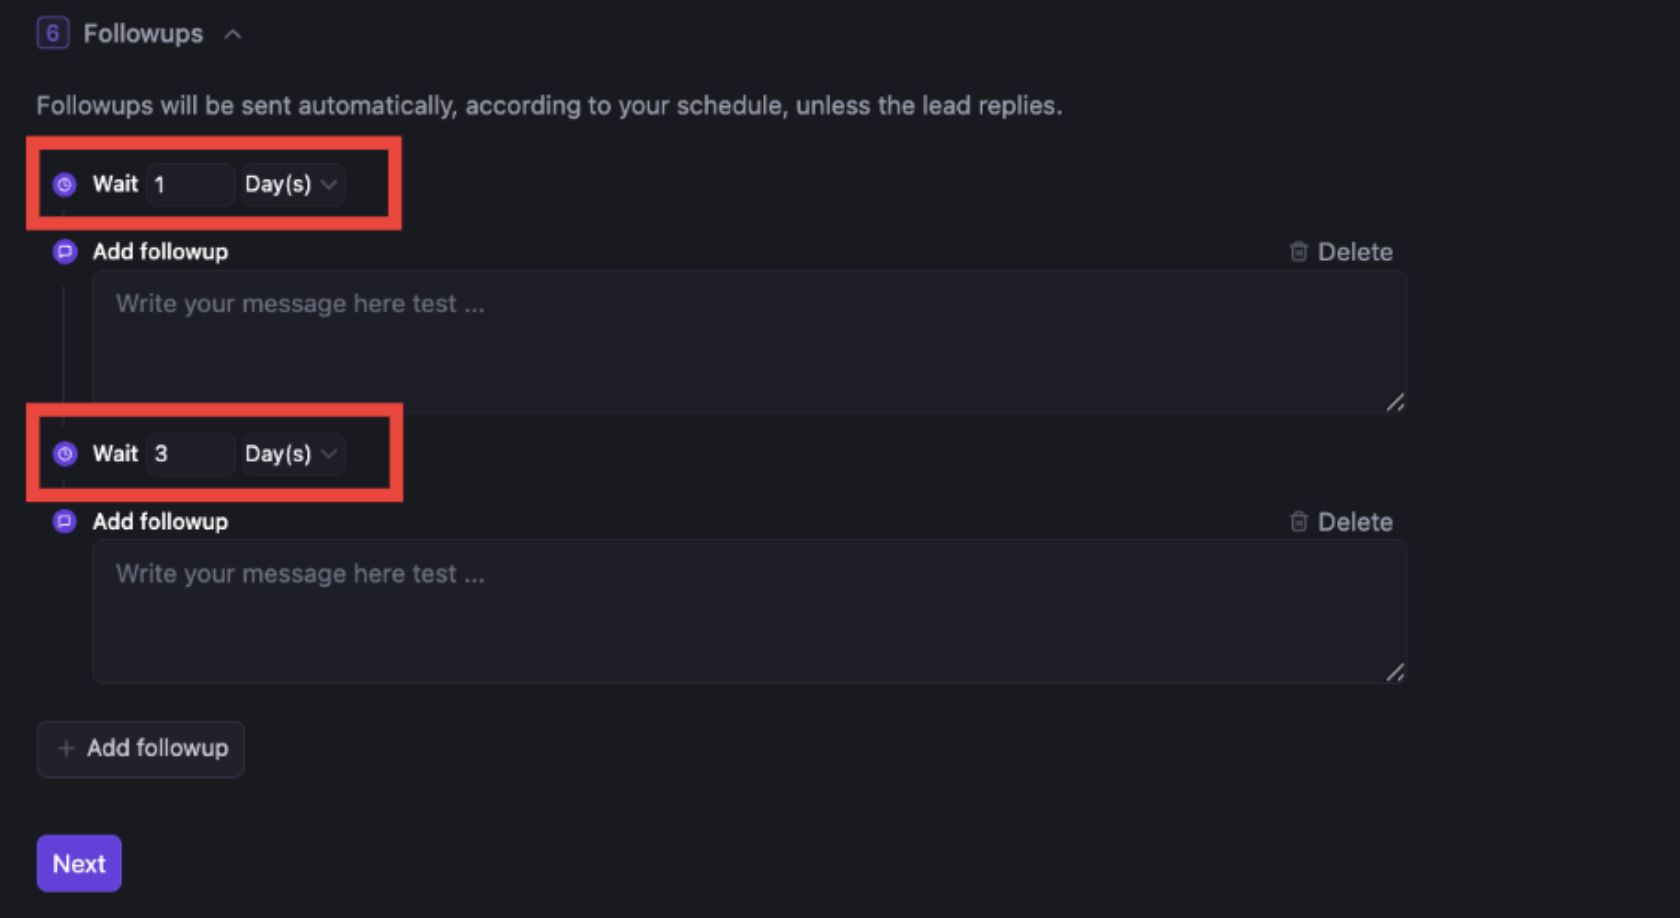
31. Select the cadence below and add the follow up scripts from the google doc and hit NEXT
    <img src="https://mintcdn.com/drippi/gdtOFt8rmEFBV6fo/images/Screenshot2025-10-27at8.06.48AM.png?fit=max&auto=format&n=gdtOFt8rmEFBV6fo&q=85&s=644d26954e16d6a52f43e1fd4c006bed" alt="Screenshot 2025-10-27 at 8.06.48 AM.png" width="1680" height="918" data-path="images/Screenshot2025-10-27at8.06.48AM.png" />
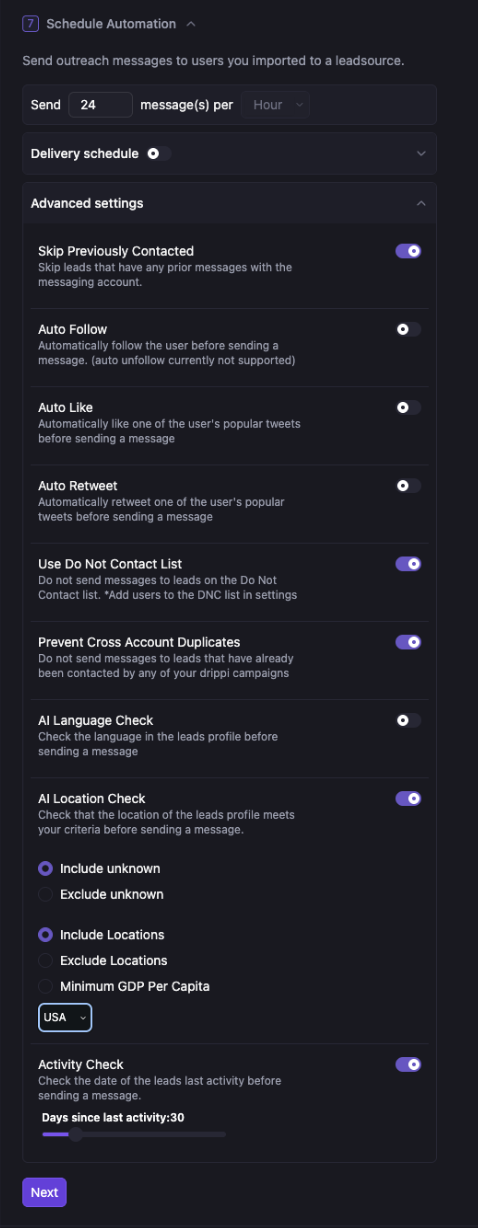
32. Hit advanced settings and make sure these settings are set up:
    <img src="https://mintcdn.com/drippi/gdtOFt8rmEFBV6fo/images/Screenshot2025-10-27at8.07.10AM.png?fit=max&auto=format&n=gdtOFt8rmEFBV6fo&q=85&s=8606991b7cb8a7e29af1d0ea72c737ee" alt="Screenshot 2025-10-27 at 8.07.10 AM.png" width="478" height="1228" data-path="images/Screenshot2025-10-27at8.07.10AM.png" />
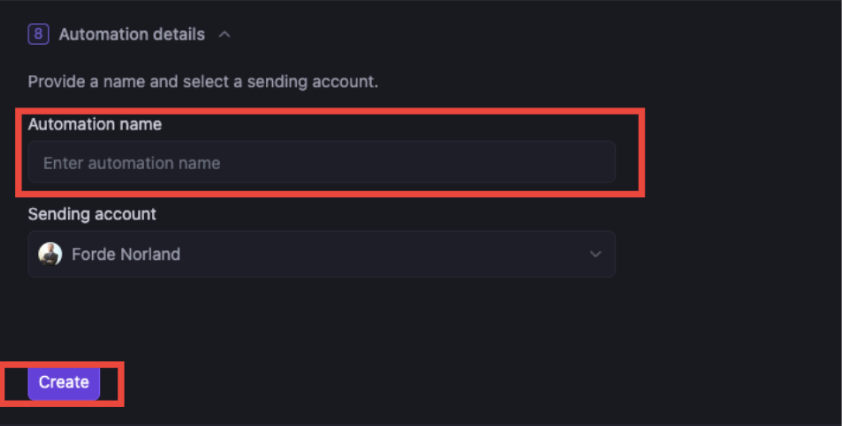
33. Give the automation a name, following convention below, select the account, and hit create

CLIENT NAME \<> DATE \<> SCRIPT \<> ACCOUNT NAME
<img src="https://mintcdn.com/drippi/gdtOFt8rmEFBV6fo/images/Screenshot2025-10-27at8.07.28AM.png?fit=max&auto=format&n=gdtOFt8rmEFBV6fo&q=85&s=9b4559c683c028eee16dee0583534a55" alt="Screenshot 2025-10-27 at 8.07.28 AM.png" width="842" height="426" data-path="images/Screenshot2025-10-27at8.07.28AM.png" />

<Tip>
  If you have any questions, please reach out to us @ [support@drippi.ai](mailto:support@drippi.ai) or book a call with our customer support team here: [https://cal.com/team/drippi/customer-support-chat](https://cal.com/team/drippi/customer-support-chat)
</Tip>